


 Today it's a tutorial that I promised my club members for this Double Slider Card. I took LOTS of pictures with each step - so it should be easy to follow along for you.
 Here you can see the page that I demonstrated to my club members this month. I attached the Double Slider Card to the page for a fun interactive page element.
 Start by cutting your card stock 5 1/2" x 11" and then score it @ 3 1/2", 7 1/8" , and 10 5/8".
 Cut (2) pieces of card stock (these will be your pull out pieces) 3 1/4" x 5 1/2".
 You will also need a (1) Old Olive & (2) Real Red - 5 petal flowers punched out & a barely banana brad from the soft subtle collection. Cut a piece of Chocolate Chip card stock 4 1/8" x 3 3/16". Then cut some Designer Paper in (2) different patterns that coordinate; 2 1/2" x 3 1/8" and also 2 1/2" x 1 1/8".
 Use your bone folder and score fold on your score lines. Also you will need to cut a strip of grocery bag (I used a walmart bag) 1 1/2" x 12 1/2".
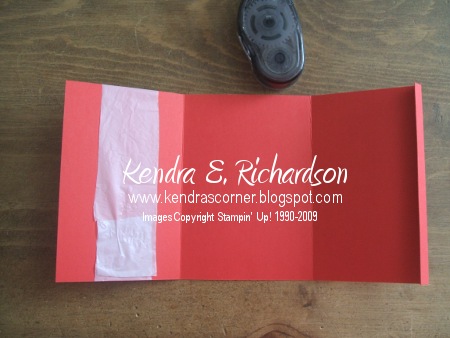 Lay your card stock in front of you as seen in the above picture. On your left hand scored panel...you are going to wrap the grocery bag around the panel adhering the ends of the grocery bag together with snail, making sure that NO adhesive gets on your card stock! The grocery bag should not be toght, but it shouldn't be loose either. You want it just so that you can slide it up & down with your fingers easily.
 Next take your slider pieces and you can sponge the edges as I did in Old Olive and Real Red, you can stamp a greeting or a design, or you can hand write a note, or even attach photos.
 Next, take your snail and put a small amount of adhesive just at the bottom of your grocery bag, making sure NOT to get adhesive anywhere else.
  Then adhere the left slider card face up (if you have a picture or have sponged edges or if you have stamped something). After that, take the 1" Circle Punch and cut a small half circle directly in the middle of the center panel.
 Then fold your left panel over.
 Put snail on the grocery bag at the top, making sure NOT to get adhesive anywhere else.
 Adhere your second slider card face down.
 Then apply red sticky tape to the very right edge (it's hard to see it in this picture).
 Very carefully peel the red sticky tape backing off...I appologize for the way this photo turned out, but I need to show you this part. Before you adhere the red sticky tape to the folded up card...you need to make sure that your slider card is underneath that flap so that the adhesive will not keep it from sliding in & out of your card. (so the grocery bag is on the leftand I have pulled the slider portion carefully over and put it under the flap. Then adhere the card together. It will not match up exactly to the other side & that's okay!
 Your folded card should look like this when all adhered together.
 Next take you Ticket Corner Punch and punch the two bottom corners in your Chocolate Chip card stock, and also the two bottom corners of your biggest designer paper piece as shown below.
 Adhere these two pieces together.
 Adhere the second designer piece to the top, leaving the same width at the top and bottom...it will not meet up in the center.
 Take a piece of Old Olive Grosgrain Ribbon just a little wider than your Chocolate Chip piece and adhere (I used snail) to the front of your card and adhere the ends to the back of the card stock.
 Assemble your pointsettia flower and adhere with a glue dot to the front of your piece.
 Next pull up carefully on your top slider piece that shows thru where you punched your half circle out. Using a regular sized hole punch or your Crop-A-Dile . Then cut a length of 1/4" Old Olive Grosgrain and pull thru and tie for your pull string.
 Next adhere your decorated designer piece to the front of your pull out card and your project is complete!
 This shows you the starting of pulling it out.
 All the way pulled out! Wouldn't this be darling with your family photo and your holiday message! You can also make this the other direction by decorating this landscape to accomadte a landscape photo.
This was my very first slider card that I made - thanks Traci!
 This is a slider card that Demonstrator Dawn Griffith made. these are darling cards for everyday occasions as well and I just wanted to share this with you! I hope you have fun creating your very own Double Slider Card.
Happy Paper Crafting - Kendra


1 comments:
Does this have a slider inside too? Not understanding the double slider part? Great tutorial though - maybe it will come to me as I make one. TFS
Post a Comment