Showing posts with label Cheap Talk. Show all posts

Sunday, August 9, 2009

Sunday Share...


These are last Saturday's Sketches. I chose to use a muted color pallet of Mellow Moss, Bashful Blue, Bordering Blue, Kraft, Barely Banana & Whisper White. My tag & card use a Technique that I will feature here on Tuesday with a tutorial - so make sure to check back here to learn how to make your own background paper. The set I used for the card & tag is called "Cheep Talk". The 8x8 page is done with punches - NO stamping on this page. I hope you'll take a look at yesterday's post of the new sketches for this week...play along and send me your photos, and I'll post them here!

HAPPY STAMPING,

KENDRA

Friday, April 24, 2009

April Club Demonstrations...


Hi Stampers!
Here are the items I demonstrated this month in our club meetings, we missed a few of you this month, and also wanted to share with you what we did. CLICK on any of the pictures to get a close up!
This is a picture of this months gift that each club member received.
I used the Boho Backgrounds Set, Scallop Circle Punch, 1 3/8" Circle Punch, Teal Ribbon, and and a Ribbon Slide.


I demonstrated this card in both groups -
This card was made using the Soft Summer Set from the current mini catalog. I embossed directly on the card with White Embossing Powder and the White Craft Pad. I applied pastel chalks directly to the embossed image. After the chalk was applied, I ran my Adhesive Remover over the top to lighten the chalks for a soft effect. I used the new Scallop Oval Punch and the Large Oval Punch for our greeting. The final touch was a piece of Pink Pirouette Striped Grosgrain Ribbon.


I demonstrated this page in both groups -
This was a fun page to make! I took a 12x12 piece of Kraft CS and on the bottom I ran the Jumbo Wheel "Friendly Words" across it in Chocolate Chip. Then I applied strips of paper from the the Designer Series Specialty - Parisian Breeze, adding a piece of 5/8" Chocolate Chip Grosgrain Ribbon. (It's such a beautiful paper!) Then on the top I used the set Baroque Motifs and stamped the flourish in Chocolate Chip Ink. I then cut a circle out of another piece of Parisian Breeze DSP. Then I cut a smaller circle out of the larger one leaving me with just an outline of the circle. I used a piece of Baja Breeze CS for my mat and also cut a smaller circle for my journaling spot. (Half of the circle is under the mat. You could cut the circle in half and line it up directly on the side of your mat if you wish. I di not because I used the Cutter Kit to distress the edges of my mat and the were not straight, so I used the whole circle. I then stamped the "Cherished" in Baja Breeze Ink. Finally I added a small embillishment on the bottom. I used a stamp image from the Baroque Motifs set again and stamped it on Vanilla in Chocolate Chip Ink. I sponged the sides of it and the four sides of my 12x12 piece. I then backed it on another small piece of the Parisian Breeze DSP and took a small piece of Chocolate Chip CS and used the Spiral Punch to add another element to the back of this piece. A half back pearl from the Pretties Kit was used in the center of this embellishment to finish the page.


I demonstrated how to make a Box In A Bag to both groups -

I used the Sunshine Garden Scrapbook Kit for it. I have posted the step by step tutorial on the blog so you could all see how to make this again.


I showed these to both groups -
I did not demonstrate these, I just shared these. Also out of the Sunshine Garden Scrapbook Kit I used papers and stickers to cover some medium sized clothespins I bought at Michaels.


These are great for holding cards, notes, or reminders!


I demonstrated this page for the Scrapbook Club -

This is a "No-Stamp Five Minute Page". Everything I used came from the Sunshine Garden Scrapbook Kit except for the 5/8" vanilla Grosgrain Ribbon and the dimensionals.


This is a close up so you can see the layered centers of the flowers. Just use dimesionals or pop-up glue dots to achieve this.


This was the card that the Card & Project Club made for their Make-N-Take this month -

We used the Cheep Talk set, So saffron DSP, Earth Element Brads, Flower Brads, and the 1" Circle Punch. This idea came directly from my upline and friend, Sue Brown. Thanks Sue!


This is the inside of the card. The two scallops are held together with a brad so that it just twists open!


This was the Make-N-Take 12x12 page for the Scrapbook Club members -

I wanted to stick with the same idea as above, so we made a page that hid the journaling area so special notes could be written and hidden! We used the Cheep Talk Set & Good Morning Sunshine & So Saffron DSP.


This is a close up of the front of the journaling area.


And this picture shows the front flipped to gain access to the journaling area.


HAPPY STAMPING,
KENDRA


Tuesday, April 7, 2009

Tuesday's Tool or Technique...

MARKERS...
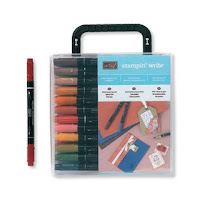
Our Tuesday tool and technique. I look at Markers being both a tool and a technique depending on how you use them. I LOVE my marker set, and use them ALL the time! There are some stamps sets thatjust look better when you use them with markers.


This card uses markers on the stamps. I also cut out and layered the stamps for a different look and used different colors (the elephants ear & lions mane) to make them pop off the card. This is the Wild About You set and the Inspired By Nature set.


This set "Cheep Talk" became one of my favorites very quickly! I LOVE-LOVE-LOVE this set. This card I found while blog surfing a while back and for the life of me when I went back to find it I couldn't! I wish to give the origional card designer the credit - because it's such a wonderful, simple design that I loved. It makes a very sweet card. PLEASE let me know if it's your creation so I can give you credit!!! What I like about using the markers here is...that they go from a tool to technique when you add contrast with darker colors. As you can see on the leaves, branches, and birds, is that I first used a lighter marker and then gave subtle highlights with a darker marker. It really makes the stamped image stand out when you highlight it in this fashion.


Markers seem like a costly investment - but they are just that...an investment. Our markers last for a long time. They are dual tipped so that you can journal and have the brush tip for coloring in stamps. I have a SU! marker set that still works after almost 8 years. Markers offer versitility with your stamp sets and it's easy to omit something and change the whole look of your image. So pull your markers out and try using them this week on a card or page!

Want a set of Markers - but don't want to spend that much at one time? Join our marker club. Get a set of markers each month and everyone takes a turn getting the case too! Call me for details.

Happy Stamping,
Kendra

Wednesday, March 25, 2009

Color Throw Down Challenge Card


These are the colors for this weeks color challenge. I had a difficult time coming up with Purely Pomigranate CS since it is a retired color. I did find some in my scrap paper drawer - Yeah lucky me!


So this is the card I made for the challenge. Below is a list of the supplies I used for this card. I hope you enjoy it and it will spark some interest and make you want to try your own challenge card this week!
Happy Stamping,
Kendra


Supplies Used;
Cheep Talk stamp set # 113204 $26.95
Tangering Tango classic ink pad #111834 $5.95
Close to Cocoa classic ink pad #103139 $5.95
Kiwi Kiss classic ink pad #111835 $5.95
So Saffron stampin' write marker #105114 $3.25
Purley Pomegranate classic ink pad - Discontinued
DSP - Good Morning Sunshine #113966 $9.95
Kiwi Kiss & Tangerine Tango CS #111347 (assorted In-Colors pkg.) $7.95
Purley Pomegranate CS - Discontinued
Whisper White CS #100730 $7.95
1 3/8" Circle Punch #104401 $15.95
1 1/4" Circle Punch #104403 $15.95
Scallop Circle Punch #109043 $15.95
Large Oval Punch #107305 $15.95
Small Oval Punch #107304 $15.95
5/8" Chocolate Chip Grosgrain Ribbon #109051 $6.95
Dimensionals #104430 $3.95
Snail Adhesive #104332 $6.95

Wednesday, February 25, 2009

February Club Demonstration Ideas


These were the 3x3 cards I made for each of my Card & Project Club gals. I used the SAB DS Paper - Delicate Dots, the SAB Set - Polka Dot Punches, and the new Eyelet Border Punch.


For my Scrapbook Club gal's I wrapped individual boxes of Conversation Hearts for each of them.


This card that I demonstrated was based on a card I received in a swap from a very talented demonstrator & my friend, Sue Brown. I loved her card, I just switched a couple of items to make it my own


This card is using the SAB DS Paper - Delicate Dots again. But I showed the ladies in all my groups this month how to take the Round Tab Punch and punch it one direction, then turn your paper and punch it the other direction...creating a round circle large enough to be the opening for our Round Scallop Punch.


Okay this card was so fun to make! I started with a regular envelope (that would fit a card 4 1/4 x 5 1/2) I sealed the envelope, cut 2 inches off one end. Stamp the larger portion of the envelope and then I ran it thru the crimper making it smaller so that it would fit up inside the 2 inch part of the envelope that you cut of.


I then made a card for the inside and attached the card to the 2 inch piece of the envelope (just use an exacto knife/hobby blade to make a small slit in the top of the envelope just big enough to get your ribbon thru and then tie your ribbon in a knot so that the card is attached to the 2 inch envelope piece). Then stamp, decorate, and embellish how you would like. For this one I used the Cheep Talk Stamp Set from the catalog - I LOVE THIS SET! This would also make a gfreat gift card holder. Just use the slit punch and instead of leaving a blank spot on the inside of the card for writing, put a gift card instead.


This was a page I demonstrated at all my groups this month. I fell in love right away with this Fifth Avenue Florals Set. I started with showing my groups how to make an 8x8 page. Sometimes scrapbooking can be overwhelming...when it gets this way for you, just start with a small idea and build on it. I took the 8x8 page and turned it into a 12x12 by just adding a few more things. I also added a tag that would serve as a journaling card for the picture on this page, and it just tucks behind the 8x8 page. So remember...start with a small idea and build on it!


This page was demonstrated at the Scrapbook Club. I used once again the SAB DS Paper - Delicate Dots, the SAB Set - Polka Dot Punches, and the new Eyelet Border Punch.


And finally for the Scrapbook Club Make-N-Take... I used many shades of green & chocalate chip cardstock. I used the SAB set - Polka Dot Punches (I used the heart to create the shamrock). We also used the Celebrate Everything Set. The date stamp we used is a Non- SU! item that I found at Walmart.