My Sunday Share today are pictures from my October Demonstrations/Clubs...
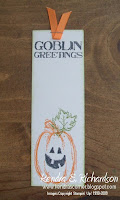
This is a bookmark I made for all my Club gals!
 I showed them how to make this very cute and simple holiday game using our Sweet Centers Set and the Sweet Treat Cups. This is a great idea for birthday party favors, to have at the kids table on Thanksgiving, or for a stocking stuffer at Christmas! Just simply change your center image and use DSP to suit your theme.
 This was a under five minute card. We are all strapped for time and during these busy months, we don't get as much time to sit and create. So run your card thru your paper trimmer using the score blade to create very thin embossed lines in a grouping. Stamp your images directly onto your card and then stamp one on a piece of scratch CS and cut it out. Stap your greeting and use a dimensional to pop up your one cut out leaf or image. Sponge edges of card and you have a card in under five!
This page was also a time saving page. Cut and sponge your edges of your photo mats (on this page I took the ink pad directly to the paper to save time). Stamp your nuts and bolts from the "Lots of Bots" set. Then cut a circle in a coordinating color, stamp your robot and your greeting. Then add a few embelishments...I added a mini library clip and a piece of vanilla CS stamped with the number stamp from the same set. I then punched it out a couple of times using the double slot punch so it looked like it came from a computer print out!
This page was the Scrapbook Club's Make-N-Take-
and it is a favorite page of mine! So many times we want to complete a page, card, or layout and we don't have matching DSP or CS for photo mats. So pull out your white gel pen and trace chipboard photo mats a little larger than your pictures. Add squiggly lines and stitching around the edges for an added touch!
Click on the picture to enlarge so you can view details.
This was the Card & Project Clubs Technique & Make-N-Take. They learned how to use Heat & Stick Powder and Glitter to emboss stamped images. They made this card and then a smaller version for their technique ring.
Are you interested in joing a club and making projects each month??? Contact me to learn more...skjj4richardson@msn.com
Are you interested in joing a club and making projects each month??? Contact me to learn more...skjj4richardson@msn.com
HAPPY CREATING - KENDRA


0 comments:
Post a Comment