 Today I'd like to share one of my all time favorite tools...PUNCHES. They are a quick and easy way to add interest, dimension, and color to your cards, tags, and scrapbook pages. You can glue punched shapes directly onto your projects or layer a sheet of card stock that has been punched over a coordinating card stock for a reverse effect. There are so many options with punches! At first it may seem like an exspense to purchase our punches, but it is an investment of your time and your money. Punches can be a great way to add interest to a card, give direction to a scrapbook page, and help create a cute project that the recipiant is sure to love and admire for years to come. Punches can create simple (1) layer dimesion, or by layering some of our punches, you can create a dimensional 3-D embellishment for your page, card, or project.
This is a 3-D flower made by using the 5 Petal Flower Punch, cutting the punched image and layering them. The small flower in the middle is from the Boho Blossom Punch. This image has my watermark, but credit must be given to my friend Sue Brown for sharing this idea with me!

This is an example of a card using the Scallop Square punched thru DSP (Designer Series Paper) to create a mat with your stamped image peeking thru. I also used the same punch, along with the circle punch to create an image at the bottom of the card.
By just adding the spiral Punch to the edge of this card, it gave it a completed look & feel...just another element that appeals to the eye, and gives a simple card a great look!

This bunny was created using Full Heart Punch. You can tell the ears and feet are full hearts cut in half. The pink is from the same...just trimmed a little smaller. A smaller punched heart from the Heart To Heart Punch was used for the nose, the Word Window Punch was used for the arms, and the 1" and the 1 1/4" Circle Punches were used to layer the butterfly at the top of the card.
 This card shows how the Scallop Circle Punch and the Circle Punch can create a "Peek-A-Boo" hole in your card. To achieve this look...first punch your circle (I used the 1 3/8" Punch) directly on your card front. Then take your cardstock or DSP (I used DSP here) and punch a circle using the 1 3/8" Circle Punch, leaving enough room around the circle you are punching. This just means don't get to close to the edges of your paper. Take your Scallop Circle Punch and go back to the circle you just punched out of your CS or DSP, and center the circle in the middle of your Scallop Circle Punch and punch it out. To adhere, I use my Two Way Glue Pen for this...and then glue it to the front of your card. It's that easy!
 PUNCHES USED TO CREATE BUNNIES:
The Large Oval, the Small Oval, the 1/2" Circle, and the 1 3/8" Circle. I just wrapped Kit Kat bars in DSP and punched out and assembled my bunnies. 6mm wiggly eyes were used, and the teeth is just a small rectangle of white CS with a black line down the middle of it. The wiskers were also drawn on. One of the ears I scored so it would fold over a bit.
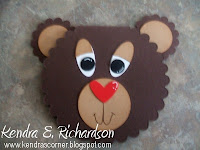
This also has my watermark, but THANKS goes again to my friend and fellow demonstrator, Sue Brown, who made these cute guys for a swap. She used the Small and Large Oval & 1/2" Circle Punch for the eyes. The ears were done using the Scallop Circle Punch and the 1 3/8" Circle Punch. The nose is from our Heart to Heart Punch. Isn't he cute!!!
So pull out your punches and play! Have some fun creating great embellishments for pages and projects and adding dimesion and interest to your cards.
HAPPY STAMPING,
HAPPY STAMPING,
KENDRA


0 comments:
Post a Comment