Wednesday, June 30, 2010

LAST CHANCE FOR RETIRING ITEMS...

Make sure to double check your wish list items with anything that may be on the discontinued lists. Don't miss out something that you wanted - just hit "Shop Now" and make sure you get those items before midnight tonight.

Wednesday's Card or Scrapbook Page Share...

Today I have a few cards for you with a TROPICAL feel! Make sure to click on the Summer Mini Catalog at right to view these wonderful products like Designer Paper, Stamp Set, Punches, Big Shot Dies, and so much more!
Have a super creative day - Kendra


Tuesday, June 29, 2010

Tuesday's Technique, Tool, or Tutorial...

Thanks for stopping back by today for this tutorial on the basket using the Two Tags Sizzix Die and the strawberries. Below you will see (2) pictures of the basket. The first picture is of the very first basket I made. The second picture is using a suggestion from a friend of mine who is a demonstrator who said to run it through the Big Shot using the Square Lattice Embossing Folder to get a basket type weave.
So just follow the directions below to make your very own! You should be able to click on any photo to enlarge!

*Colors may seem off in photos - but all basket CS was Old Olive.

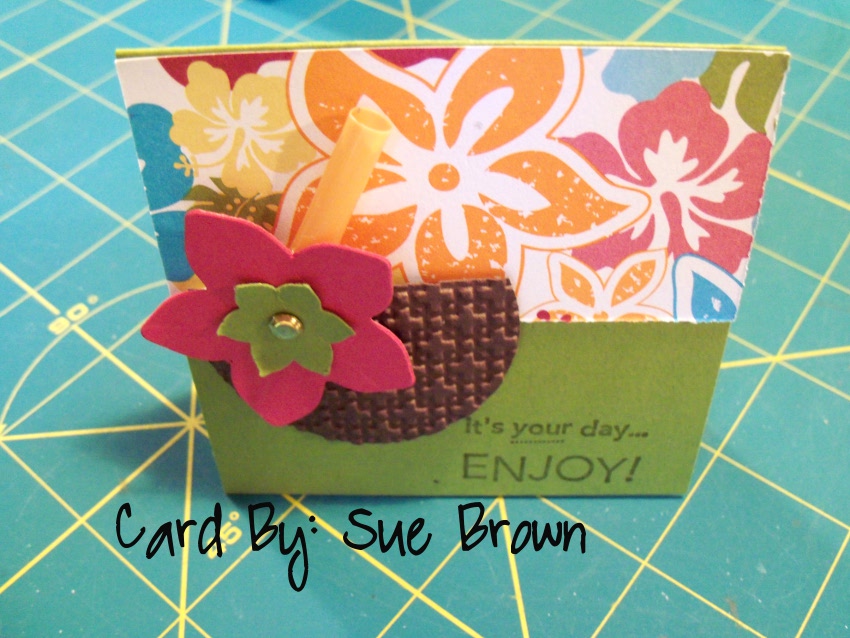
These are the pieces you will need to begin the basket; (2) tags from the die, a handle cut from matching CS - 7/8"x 6 3/4", the box bottom cut from CS -2 7/8"x 6 3/4", white and yellow flowers (2) each from the Boho Blossom Punch.

Start by sponging ALL your pieces with Chocolate Chip Ink.

OPTIONAL: Run your tags through the Big Shot using the Embossing Folder...or you can wheel or stamp them, or even leave them plain like the very top picture.

Next put Sticky Strip down both edges of your CS piece measuring 2 7/8 x 6 3/4". You should score this piece first lengthwise at 1/2" on each side & 2" from each of the ends.
Next with scissors snip on the score lines to create your bottom piece.

Peel your sticky strip from one side only on all (3) pieces and assemble that side of the box. Repeat with the other side.

Next put stcky strip on the bottom portion of your tag and adhere to the front and back of the box securing the bottom of the tag underneath.
***You can also cut that part of the tag off completely and just stick it on the sides of the box instead of anything on the bottom...it's up to you!

Using your bone folder...gently slide it across the handle piece to break down the fibers in the CS and give it a natural curve for your handle.

Insert the CS handle in through the slots on the tags - NO adhesive needed.

Layer your flowers and poke a Black brad through them leaving them open.

Take your paper piercer and poke through the hole from the inside out using the hole in the tag as a guide for where your brad should be.

Pop brad through the hole and open the back of the brad to keep in place. This completes your basket for now.

STRAWBERRY
You will need the following for your strawberry; (4) Hearts cut from the Scalloped Heart Embossilit & (1) Certainly Celery Punched 5 Petal Flower.

Using Old Olive Ink- sponge the punched flower. Using Chocolate Chip Ink- sponge outside edge of all four hearts. Using Cherry Cobbler or another red ink- sponge the dots on the front of the hearts.

Next score all four hearts down the middle.

Fold the hearts and starting with the first one put some glue on it and sandwich another heart on top of it.
SORRY about some of the picture quality- not sure what's going on with my camera! Probably operator error.
Continue adhearing all heart until you have to stick the first heart to the fourth heart (DON'T do that step yet!).

Punch an 1/8" hole into the center of the five petal flower punched image.

Take a small piece of ribbon (I'm using 1/8" Taffetta Ribbon in Black) angle the ends and put it through the hole.
Next (I forgot to take a picture of this part...so you'll have to imagine this - sorry) run your ribbon down the center of the strawberry between heart #1 and #4. Then put some glue there and close the strawberry up adhearing heart #1 to #4 sealing your ribbon ends inside making sure none of your ribbon shows.
*** I also used my bone folder to curve the leaves before I put the ribbon through the hole.

Your strawberry is complete now. Let dry and make several to put inside your box.

Here is a picture of my completed box and adding the strawberries inside. You could also add some strawberry hard candies to the inside as an extra treat! I also added ribbon to the outside of the box to complete.
Thanks for stopping by and I hope you enjoyed this tutorial. PLEASE let me know if you have any questions!
Happy Creating - Kendra


Monday, June 28, 2010

NEW CLEARANCE RACK ITEMS...

New items have been added to the CLEARANCE RACK. You can check out these and several other new items by clicking HERE.
Don't miss out on any of these great deals @ up to 60% off!


Monday's Big Shot Project Idea...

Today I have a cute basket and a darling strawberry to share with you. The basket was shared on this years cruise by Lisa Curcio and it uses the Bigz Die - "Two Tags". The strawberry is made using the Polka Dotted Heart Embossilit. Make sure to check back here tomorrow for a tutorial on how to create both these items.
Have a terrific Monday - Kendra


Sunday, June 27, 2010

Sunday Share...


Today I have some fun & cute tropical items to share with you. My up-line, Sue Brown shared this idea with us...and I can't remember which blog she said she got it off of - but I'm sure glad she shared this darling beach bag idea with us! Then she also shared a card she made using the Island Oasis Designer Paper. I hope you enjoy these cute items. Make sure to check out the Summer Mini Catalog for all these cute and wonderful Tropical items; Island Oasis Designer Paper, Tropical Party Stamp Set, Island Oasis Party Favor Boxes, Island Floral Bigz Die.
Hope your Sunday is going well - Kendra


Saturday, June 26, 2010

Saturday Sketch & Inspiration Challenge...


Use these as inspiration as you get a chance to create. Take an element, object, or color and use it as your starting point. You probably won't recongnize the set I used...that's because it's a new Level 1 Hostess Set called "BECAUSE I CARE" for this card. I love hydrangeas!!!
Have fun creating - Kendra