Tuesday, August 31, 2010

Tuesday's Technique, Tool, or Tutorial...


To create this look - use the Baby Wipe Ink Pad Technique.
For this technique you will need 3 - 4 Ink Refill Colors that coordinate, baby wipes, & a paper plate.
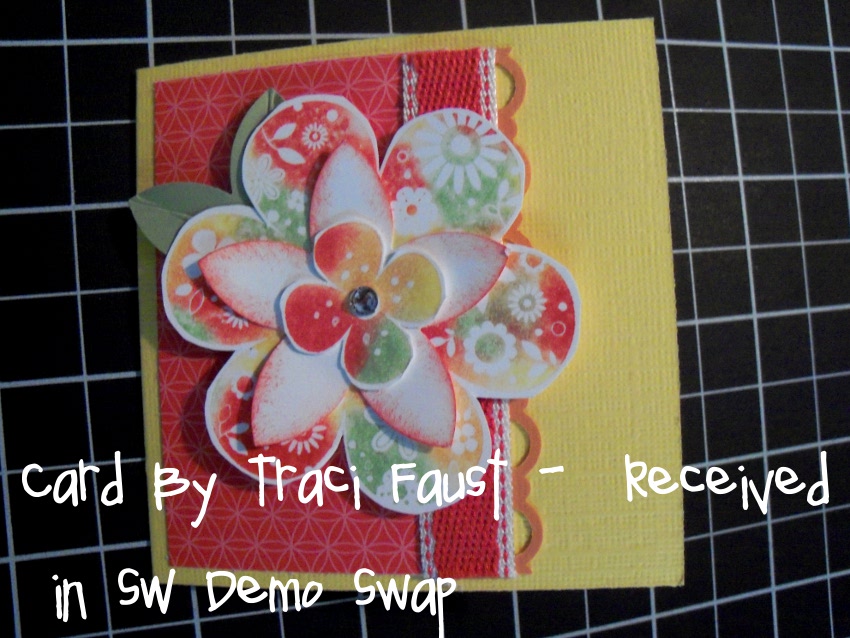
The card above uses the Printed Petals Set.
  1. Take 3-4 thick baby wipes and fold in half and place in the center of a paper plate.
  2. choose 3-4 Ink Refill colors that coordinate...and starting with the lightest color put 4 to 5 drops in the center of the wipes leaving space in between the drops.
  3. Take your next darker ink refill color and repeat the process until you have used all the re-inker colors and you have created an ink pad on the baby wipe.
  4. Next take your stamp and ink it up on the baby wipe and stamp your image - it's as easy as that!

Monday, August 30, 2010

Monday's Big Shot Project Idea...

Today I am using the Itty Bitty Box Die Cut and the Elegant Lines Embossing Folder (information on these items below). This ie makes such a sweet box...and it's the perfect size for (2 or 3) Ghirardelli square chocolates. What a wonderful gift for
wedding guests!


Bitty Box & Envelope Stampin' Up! Bigz Xl Die
#115967 - $42.95

You can use Stampin’ Up!’s exclusive Bitty Box & Envelope Bigz die to create custom boxes and envelopes from any card stock or Designer Series paper. The envelope is just the right size for many uses. Slip a small note inside and attach it to a vase of flowers. Or use it on a scrapbook page as a memorabilia pocket. This bitty box is perfect for holding small treats and gifts ■ Designed to cut through one sheet of paper or card stock at a time ■ Use with Sizzix Big Shot machine and extended cutting pads ■ Die size: 6" x 13-3/4"


Elegant Lines Textured Impressions Embossing Folder Die
#119277 - $7.95

Stampin’ Up!’s exclusive Elegant Lines Textured Impressions Embossing Folder creates a deeply embossed image on card stock and paper. The die embosses one side of the paper and debosses the other side, so you can use either side, depending on the look you want to achieve. You can emboss an entire card front edge-to-edge or create a large embossed image. ■ Designed to cut through one sheet of paper or card stock at a time ■ Use with Big Shot machine, standard cutting pads, and multipurpose platform ■ Die size: 4-1/2" x 5-3/4"

Sunday, August 29, 2010

SUNDAY SHARE...


Today I wanted to share a card that uses pinks & blacks and incoporates our new Blck Flourish Designer Jewels. These are showcased in our new Holiday Mini Catalog with our Halloween items...but think outside of the box for ways to use these gems into your artwork. The set I used for this card is called...Artistic Etchings.
Have a wonderful Sunday!

Saturday, August 28, 2010

Saturday Sketch & Inspiration Challenge...

Today's Sketch & Inspiration challenge is all about Polka Dots. Be carefree & whimsy in your design...but most of all - HAVE FUN!


Friday, August 27, 2010

I wanted to SPOTLIGHT some of the new items that will be available on September 1st from our new Holiday Mini Catalog . . .

  • Textured Impressions Embossing Folder - Spider Web
  • 1/2" Lace Trim - Raven
  • Designer Jewels - Black Flourish
  • Wicked Cool Stamp Set (In Idea Book & Catalog)
  • Wicked Fun Designer Specialty Paper (In Idea Book & Catalog)
  • Goblin Greetings Set (In Idea Book & Catalog)


HALLOWEEN IS JUST AROUND THE CORNER - so make sure to plan ahead and order your goodies so that you can create!


Thursday, August 26, 2010

My Digital Studio Project Share...

Good morning...or I should say afternoon! I'm not really sure yet what is up with my computer lately...but I did finally get this to post - yeah! Today for MY DIGITAL STUDIO SHARE I have (5) Baby Announcement ideas for you. My sister Kari had a baby last month and asked if I'd help her with some announcements. I had so much fun creating these and I hope you find some inspiration for a future project or idea in them.


Wednesday, August 25, 2010

Wednesday's Card or Scrapbook Page Share...


Today I have (2) cards to share with you. Both use the same monochromatic color scheme, and are very minimal. Just some designer paper, ribbon or brads to accent the artwork. I apologize for my watermark the last few days...I'm using a different computer and photo editing program this week and for some reason...it's not being cooperative!
The sets I used were Countryside and Just Believe. By clicking HERE you can learn more about these great sets and any of the accessories.

Tuesday, August 24, 2010

Tuesday's Technique, Tool, or Tutorial...

It's a TOOL today!
I want to share one of my most favorite tools with you today...it's called a Paper Piercing Tool. I most of the time use it along with the Mat Pack, but on this card I used it by itself to create (2) holes to run my Hemp Twine thru. This is such a sweet card that my friend Karen Reid shared with us at our last SW Demo Meeting earlier this month. It uses the Star Punch for the banner flags and I used a piece of the Designer Paper Stack in Subtles, and the A Word For You Set - THANKS KAREN!
Below you will find the information on this wonderful tool.
Have a terrific Tuesday - I'm off for a long 15 hour day today of working the polling booths - make sure to vote!


Paper-Piercing Tool
#116631
$3.50
Create tiny, precisely-spaced holes on any paper using our steel paper-piercing tool. You can use it along with the template in the mat pack to create precisely spaced, perfectly aligned holes.
■ 3-1/2" handle with 3/4" piercing tip
■ Includes storage tube and protective cap
■ Can be used with the paper piercing template in the mat pack or with the paper-piercing guides on Classy Brass templates
CLICK HERE TO ORDER ANY OF THE ABOVE ITEMS

Monday, August 23, 2010

Designing With Fabric...

Yes- you heard correctly! If papercrafting wasn't enough for you, here is a new twist to throw into the mix... designing with fabrics. Our new Designer Fabrics will come out in our Holiday Mini Catalog that will release September 1st, but the excitement does not end there.
Stampin Up! also has some new Bigz Dies that will be great to use with our fabrics and in your paper crafting designs. You can look forward to a variety of trim and border shapes for those special holiday & everyday projects...as well as two different size squares. I can't wait to get my hands on these and create and play with my Big Shot & sewing machine!


Sunday, August 22, 2010

SUNDAY SHARE...

Just a card and a page to share with you today. Both of these were club projects that I demonstrated this month. I LOVE our new Antique Brads, Victoria Lace, and Pearl accents...which I used on the "Dream" scrapbook page. The card uses one of my newest favorites...our Dotted Scallop Border Punch. I hope your enjoying your weekend and that you'll check back later this week for some fun & cute projects!